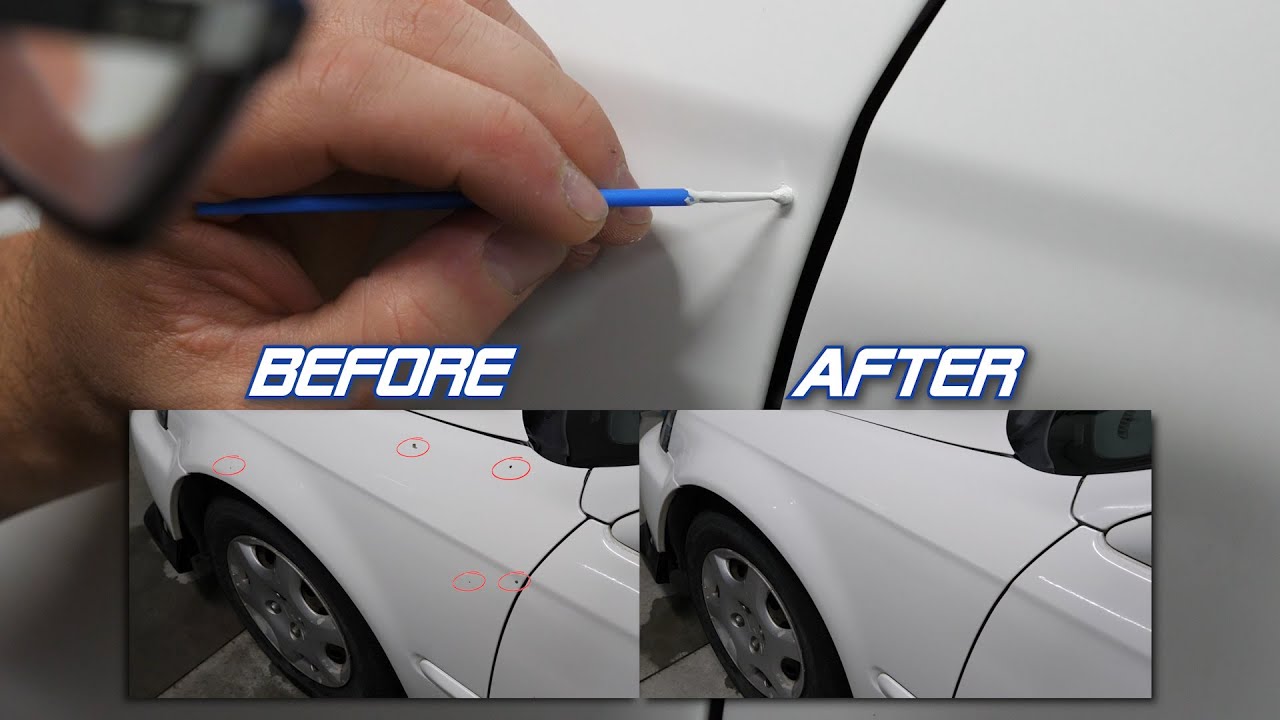
How to Fix Car Paint Chips Yourself
Discovering unsightly paint chips on your beloved vehicle can be quite disheartening for any car owner․ These minor imperfections, often caused by small stones, road debris, or even careless parking, not only detract from your car’s aesthetic appeal but also pose a risk for more significant damage down the line․ Fortunately, addressing these blemishes doesn’t always require an expensive trip to a professional body shop․ With the right tools, materials, and a bit of patience, you can effectively fix car paint chips yourself, restoring your vehicle’s flawless finish and protecting its underlying metal from rust and further deterioration․
Why Address Automotive Paint Damage Promptly?
Ignoring even small paint chips on your car can lead to bigger problems over time․ The exposed metal beneath the paint is vulnerable to moisture and oxygen, initiating the process of corrosion․ Repairing these chips quickly preserves your vehicle’s structural integrity and its visual appeal․
- Prevents Rust Formation: Exposed metal is susceptible to rust, which can spread rapidly and cause extensive damage if left untreated․
- Maintains Resale Value: A well-maintained exterior, free from visible blemishes, significantly contributes to a higher resale value for your car․
- Enhances Aesthetic Appeal: A smooth, chip-free paint job makes your car look newer and more appealing, reflecting pride of ownership;
- Avoids Costly Future Repairs: Addressing small chips early prevents them from escalating into larger, more expensive repair projects․
Essential Tools and Materials for Car Paint Touch-Up
Before you begin the repair process, gathering all necessary supplies is crucial for a smooth and efficient workflow․ Having everything ready ensures you won’t have to pause midway through the task․ A well-prepared workspace contributes significantly to the quality of the final repair․
- Car wash soap and clean towels
- Rubbing alcohol or a dedicated degreaser
- Automotive masking tape
- Fine-grit sandpaper (e․g․, 2000-3000 grit) or a sanding pen
- Touch-up primer (matching your car’s paint system)
- Touch-up paint (matched to your car’s specific color code, usually found on the VIN sticker)
- Small application brushes or toothpicks
- Clear coat pen or bottle
- Polishing compound and microfiber cloths
- Safety gloves and eye protection
Step-by-Step Process: Flawless Car Paint Chip Restoration
Successfully fixing a paint chip involves several distinct stages, each requiring careful attention․ Following these steps sequentially will help you achieve a professional-looking repair․ Patience is key throughout this detailed process․
| Stage | Description | Key Tip |
|---|---|---|
| Initial Cleaning | Thoroughly wash and dry the car, then use a degreaser to remove wax, grease, and contaminants from the chip area․ | Ensure the area is completely dry before proceeding․ |
| Surface Preparation | Lightly sand around the chip to create a smooth surface for adhesion, masking off surrounding good paint․ | Use very fine-grit sandpaper and light pressure to avoid damaging good paint․ |
| Primer Application | Apply a thin layer of primer directly into the chip to promote paint adhesion and prevent rust․ Allow it to dry fully․ | Apply multiple thin coats rather than one thick one․ |
| Paint Application | Carefully apply thin layers of your car’s color-matched paint, allowing each layer to dry before adding the next․ | Build up the paint gradually until it’s level with the surrounding surface․ |
| Clear Coat Application | Once the color coat is dry, apply a clear coat to protect the new paint and blend it with the existing finish․ | Apply clear coat thinly and evenly for optimal shine and protection․ |
| Finishing and Polishing | After the clear coat cures, lightly wet-sand the area (if needed) and then polish to achieve a seamless, high-gloss finish․ | Use a high-quality polishing compound for best results․ |
Detailed Surface Preparation for Paint Chip Repair
Proper preparation is the bedrock of any successful paint repair․ Begin by washing your entire car, paying special attention to the chipped area․ After drying, use rubbing alcohol or a specialized automotive degreaser to meticulously clean the chip and the surrounding paint․ This step removes all waxes, oils, and silicones that could prevent new paint from adhering properly․ For chips that have already started to rust, carefully use a small piece of fine-grit sandpaper or a rust-removing pen to gently remove all traces of rust, ensuring only bare metal or solid paint remains․
Applying Primer to Damaged Areas
Write a quality, in-depth, magazine-style article on the topic:
Write in English
Use a clickbait and catchy headline. Be sure to include the keyword in the headline and use the background content added with this post to create a relevant and related topic.
Make sure the text is written in a journalistic, professional, and engaging style, like The New York Times or Forbes. The tone should be optimistic, forward-looking, and persuasive. Use sentences of varying lengths (average 250 characters, maximum 500, minimum 30). Use appropriate analogies, descriptive adverbs (e.g., “incredibly effective”), and correct adverbial phrases (e.g., “By integrating insights from AI…”). Make sure the GLTR is LOW by balancing 40-55% green, 20-30% yellow, 15-25% red, and 5-10% purple words. Use present and past participles to add dynamism. Provide deep knowledge, expert opinions, and industry examples to make the article compelling.
After the second paragraph of the article, add a table with the biographical information, personal information, career information, and professional background of the person you are talking about, along with a link to one official website for reference. The table should be in a format that is easy to embed in WordPress.
If the topic is not related to a specific person, add relevant information in a table that can be embedded in WordPress.
Ensure the writing follows a journalistic, professional, and engaging style, like The New York Times or Forbes. The tone should be optimistic, forward-looking, and persuasive. Use varied sentence lengths (average 250 characters, max 500, min 30). Incorporate relatable analogies, descriptive adverbs (e.g., ‘remarkably effective’), and proper adverbial phrases (e.g., ‘By integrating AI-driven insights…’). Ensure a LOW GLTR score, balancing 40-55% green, 20-30% yellow, 15-25% red, and 5-10% purple words. Use present and past parts to enhance dynamism. Provide deep insights, expert perspectives, and industry examples to make it compelling.
After the second paragraph of the article add table with bio data and personal information, career, professional information of person in topic, also add link to one authentic website for reference, the table should be in the form that it can be easily inserted in wordpress.
If the topic is other than person related than add related information in the form of table that can be inserted in wordpress.
Once the area is clean and dry, it’s time for primer․ Primer serves as a vital barrier against rust and creates a uniform surface for the color coat․ Using a very fine brush or toothpick, apply a tiny dab of primer directly into the chip․ The goal is to fill the chip without getting primer on the surrounding good paint․ Allow the primer to dry completely according to the manufacturer’s instructions, which typically takes several hours․ If the chip is deep, you might need two thin coats, ensuring each layer cures before the next application․
Matching and Applying the Car Paint
This stage requires precision and a steady hand․ Shake your color-matched touch-up paint thoroughly․ Using a fine brush or toothpick, apply a minute amount of paint into the center of the chip․ Do not try to cover the entire chip in one go․ Instead, build up the paint in extremely thin layers, allowing each layer to dry for 10-15 minutes before applying the next․ Continue this process until the new paint is slightly raised above the surrounding surface․ This slight elevation allows for future leveling without creating a depression․
Protecting the Finish with Clear Coat
After the color coat has fully dried (ideally for at least 24 hours), it’s time to apply the clear coat․ The clear coat provides UV protection, enhances gloss, and creates a durable barrier against environmental elements․ Apply a thin layer of clear coat directly over the new paint, extending slightly beyond the repaired area to blend it in․ Again, multiple thin coats are preferable to one thick one․ Allow the clear coat to cure for several days, or as recommended by the product manufacturer, before moving to the final steps․
Final Polish and Buffing for a Seamless Look
Once the clear coat has completely hardened, you can refine the repair․ If the repaired spot feels slightly raised, you can gently wet-sand it with extremely fine-grit sandpaper (e․g․, 3000 grit) to level it with the surrounding paint․ Use plenty of water and very light pressure․ After sanding, use a high-quality polishing compound on a microfiber cloth to carefully buff the area․ This will remove any sanding marks and restore the shine, making the repair virtually invisible․ Finish with a car wax for added protection and brilliance․
Frequently Asked Questions About Car Paint Chip Repair
How long does car paint chip repair typically take?
The actual hands-on repair time for a single chip is relatively short, perhaps 15-30 minutes, but the overall process, including drying and curing times for primer, paint, and clear coat, can extend over several hours or even a few days․ Each layer needs sufficient time to dry completely to ensure durability and a smooth finish․
Can I fix deep scratches as well as chips?
Yes, many deep scratches can be repaired using similar touch-up techniques․ However, very deep scratches that expose a large area of metal or involve significant body damage might require more extensive sanding, filling, and potentially professional expertise to achieve a flawless result․ The key is determining if the scratch has penetrated all layers of paint․
What if my car’s paint color is difficult to match?
Modern car paint colors can be complex․ Always use your car’s VIN (Vehicle Identification Number) to get the exact paint code, which ensures the best possible match․ If you’re still concerned, test the touch-up paint in an inconspicuous area, like inside a door jamb, before applying it to the visible chip․ Custom paint mixing services are also available for unique or aged colors․
Is professional help ever necessary for paint chips?
While DIY repair is effective for most small chips, professional help is recommended for very large chips, numerous chips spread across a panel, chips in highly visible or intricate areas, or if the damage involves significant denting․ Professionals have specialized equipment and expertise to handle complex repairs, ensuring a perfect color match and seamless finish that might be challenging for a novice․
Fixing paint chips on your car is a rewarding DIY project that significantly enhances your vehicle’s appearance and longevity․ By carefully following each step, from thorough cleaning to final polishing, you can achieve impressive results․ This process not only saves you money but also gives you a deeper appreciation for your car’s maintenance․ Embrace the satisfaction of restoring your vehicle’s pristine look with your own hands․ Your car will thank you with a renewed, gleaming finish․
